Installing Apache 2 and PHP 5 (and MySQL) on Windows XP
Contents
- Introduction
- Set up a directory structure
- Download and Install Apache 2.0
- Download and Install PHP 5
- Configuring Apache
- Some extra steps: Setting up a development environment and installing MySQL
- Conclusion
0. Introduction
First, a couple short notes on whom this tutorial is for. First, it's for people who want to install
PHP 5 and Apache 2; other versions will follow similar procedures, but they will by no means be identical, and these instructions will not work with them. Second, I've written this mostly with the beginner in mind, with the objective being to walk you through installation and setup of your own local web server to use as a learning and testing tool.That said, the instructions here should serve as useful information for the more experienced web developer/administrator who needs a refresher on installation, or runs into a problem along the way. If you're planning on connecting your server to the internet and serving files to the World, as usual, make sure you know what you're doing first -- you'll get very little sympathy if something goes wrong because you didn't.
On business: In this tutorial, I'll show you how to install Apache and PHP on Windows XP, as well as how to set up a nice working environment. As a bonus, I'll also show you how to install MySQL if you're interesed.
Below are some words of encouragement for those who might not know what all of this means. If you're already convinced, skip ahead to the next section. :-)
Note: If you're a little unsure of what a web server is, it can mean two things: (1) a computer that serves web pages and other content to web browsers and other client programs (this is the definition most people learn first), or (2) a program on a computer
that enables it to serve such content. Apache is a web server as defined in the second sense, i.e. it is software. Once you install it on your computer, you will be able to view web pages, PHP pages, etc, on your local machine as if they were on a site on the internet. In fact, other computers connected to your local network will be able to access the content you serve, and if you choose, you can even make your server available on the internet.
Many people think they need to buy web hosting in order to learn PHP and test their scripts.
You can learn a lot by having some space on a remote server, and they often have many modules and extensions installed and configured, so you can focus on your programming and not have to worry about the details. I learned to program on a remote server, and I picked up a lot of skills, like using the Linux shell, along the way. But you don't have to do it this way. Inevitably, you will eventually want to run a web server on your local machine so you can test scripts quickly and easily, and you might be surprised at how much faster you can actually program if you do this. My advice is, start early and install a web server and PHP on your local machine today!
Like learning to program remotely, it will teach you useful skills. It allows you to program more quickly, to play with different configurations both on- and offline, and best of all, if the web server is free it doesn't cost you a dime. In this tutorial, I will show you how to install one of the most popular web servers, Apache 2.0, and PHP 5 on your Windows XP machine. I'm choosing the Windows environment simply because a lot of people, especially people who are learning to program, have it and I'd like this to be useful to as many people as possible.
Apache and PHP can be installed on other versions of Windows and other operating systems as well. I've chosen Apache because it is immensely popular, and because it is free.
1. Set up a directory structure
First, let's make a directory where you can put PHP and Apache (and maybe other programs such as Perl in the future).
To avoid any potential problems, it's best to create this directory on a path that does not have any spaces. I put mine on a second partition, in the WebServer directory of the Web folder where I keep all my web development data:
D:\Web\WebServer
Pick something similar for yourself, and create your folder.
Inside that folder, create a folder called PHP. Simple enough: now on to the good stuff.
2. Download and Install Apache 2.0
Note: I've gotten a couple questions about installing PHP 5 with Apache 2.2.
When I first wrote this tutorial, that would not work, because the php5apache2.dll
that came with PHP 5 was incompatible with Apache 2.2. However, PHP 5.2.5 (the latest version as of this revision) includes an php5apache2_2.dll file that is compatible with Apache 2.2. If you want to install Apache 2.2, use this DLL instead when following the instructions in this article. Thanks to Wouter Smit for pointing this out.
First, download the Win32 Binary (MSI Installer — see the note immediately below) from the Apache download page. To the right of the download link, you will see a link called "[MD5]". Follow this link after your file has downloaded, and you will see some text that looks like
44358b283212d5c144524231fc0cb562 apache_1.3.34-win32-x86-no_src.exeLeave this page open - we will use it in a minute to verify the integrity of the
installer we just downloaded.
Next, go to pc-tools.net
and download the md5sums-1.2.zip file to the same folder where you saved the Apache installer
(the desktop is fine), and unzip it. Make a new text file in the same folder and put the following in it:
md5sums -p -n -b apache_2.0.55-win32-x86-no_ssl.msi
(if you have downloaded a slighly different version of the installer, change the name of the file to match yours).
Save the file as check_Apache_md5.bat, and run (open) it. The screen that pops up should look something like
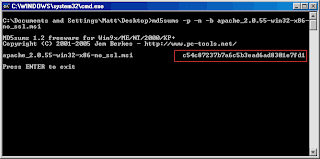
Compare the code in the red box to the code on the page opened by the "[MD5]" link. If it is the same, then your file integrity is good, and you can proceed. If it is different, the file is damaged and you should download it again, probably from a different mirror (see the top of the Apache download page).
Once you have a file that is authenticated, you can delete the check_Apache_md5.bat, themd5sums-1.2.zip file, and the md5sums.exe and md5sums.txt files (although you may want to keep the md5sums program for future use).
Now we're ready to install. Double-click on the installer. Read the agreements and information, clicking next to move through each screen. On the fourth screen, you will see the following:
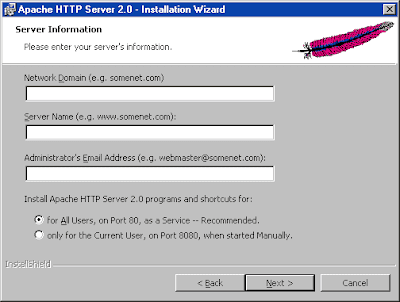
I'll quote the explanation of each of these settings directly from the Apache documentation:
# Server Name. Your server's full DNS name. From the example above, you
would type server.mydomain.net here.

# Administrator's Email Address. Enter the server administrator's or
webmaster's email address here. This address will be displayed along
with error messages to the client by default.

# For whom to install Apache Select for All Users, on Port 80, as a
Service - Recommended if you'd like your new Apache to listen at port
80 for incoming traffic. It will run as a service (that is, Apache will
run even if no one is logged in on the server at the moment) Select
only for the Current User, on Port 8080, when started Manually if you'd
like to install Apache for your personal experimenting or if you already
have another WWW server running on port 80.
Here you have a few options:
If you are going to be using Apache only for testing scripts on your own machine, you can enter
localhostfor the first two values and anything you'd like for the email
address (e.g.admin@localhost). If you're only going to be using Apache sometimes and
only when you are logged on, it does not make sense to run it as a service, because it will eat up system resources and potentially pose a security risk. Select "only for the Current User, on Port 8080, when started Manually". Press "Next" and skip ahead.If you would like to install Apache to be used as a local area network server, you should set your router to assign the computer you are installing Apache on to have a static LAN ip address (if it does not already have one. This issue is beyond the scope of this article; refer to your router's documentation, or consult the person in charge of your network). Enter either this IP address, or a network name that you will use to acess the server from within your network in the first two boxes (if you choose a name, you will need to update the
Hosts file of the users on your network so that when they type the name in a browser, it maps to your computer's IP addresss). Enter an appropriate email address in the
third box, and choose "for All Users, on Port 80, as a Service - Recommended". Press "Next" and skip ahead.If you would like your server to be accessible through the internet, you will need your computer to either have a static internet IP address and set up a domain name server
(DNS) to point your domain name to your computer's IP (this is beyond the scope of this article). If you do not have a static IP, you can set up your computer to have a static local IP as described in the last paragraph, and use a dynmaic DNS service such as
dyndns.com to keep your current IP up to date on the DNS. A good router
will allow you to automatically update the dynamic DNS when the router acquires an IP address. You will also need to set up port forwarding so that all incoming traffic on port 80 is forwarded to your computers static local IP address. Enter the dynamic DNS domain name, e.g. mysite.dnydns.org, for the first two entries, and an appropriate email adress for the third. choose "for All Users, on Port 80, as a Service - Recommended". Press "Next" and skip ahead.
Note:
If the last paragraph does not make sense, you should probably not do it yet, because there are important security issues you are most likely not aware of. Before setting up a web server to run on the internet, make sure you have educated yourself about all the factors involved. You make your computer available to outsiders at your own risk; if you make it available in ignorance, you do so at your peril.
The next screen you see will look like this:
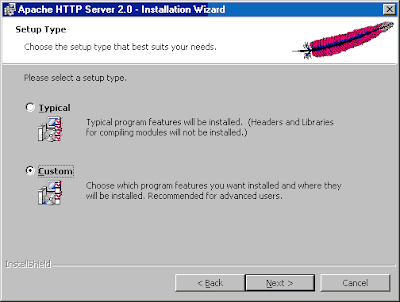
Choose "Custom" and press "Next". On the following screen
you will see the default path Apache installs to:
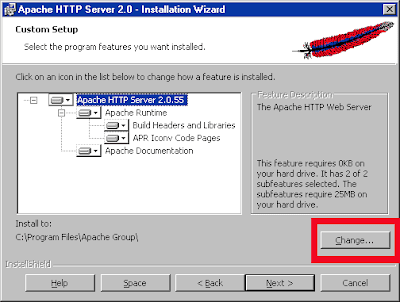
Click the "Change..." button (boxed in red in the picture), and choose the WebServer folder (or
whatever other name you chose) you made when you created the directory structure above. Click "Next".
On the next screen click "Install". After it installs click "Finish". Congratulations, you just installed Apache.
It is located in your WebServer folder in the Apache2 directory.
Let's make sure it worked. Go to your programs folder in the Start menu and find the Apache HTTP Server folder.
Go to the Control Apache Server folder, and start Apache

If you installed Apache as a service, you can also start it by double-clicking on the Apache Service Monitor
tray icon (which looks like:  ) and pressing the "Start" button in the window that appears.
If you did not install it as a service, you will see a blank command prompt window appear while Apache is running.
This is normal.
The first time you run Apache, you will probably see a security warning pop up:
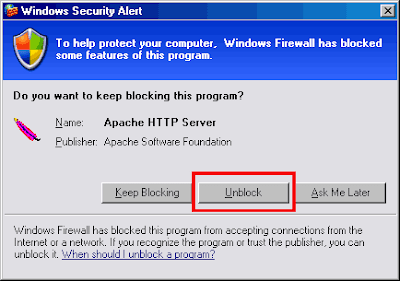
This is because windows has detected that Apache is opening a port on your computer, and it is checking with you about whether it should let Apache continue. Click the "Unblock" button to allow Apache to function.
Note: While we're talking about these security warnings, it's worth noting that the Winows XP firewall is far from ideal, especially for advanced users. Even compared to most free alternatives, the best you can usually say is that it's better than nothing. Especially if you're considering connecting your web server to the internet, you ought to get a separate firewall program.
Some good freeware/shareware alternatives are ZoneAlarm,
Kerio Personal Firewall,
Agnitum, and
Sygate Personal Firewall.
Now, let's open up a web browser and make sure Apache is running. Type in the name of your server (e.g. localhost, or your domain name or IP address) in the location bar of the browser. If you did not install Apache as a service, follow the server name with :8080 (for example, if you are running the server as localhost, you would type localhost:8080. If Apache is working, you should see a page that looks like
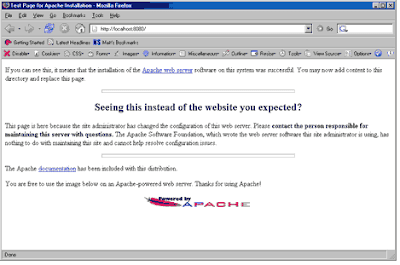
If so, you're ready to move on. If not, something is wrong. It is hard to be sure what, but it might help to ask for assistance in the ERT forum. Otherwise, your best
bet is to uninstall Apache and try again.
Unless you have some reason for Apache to run on port 8080, it is far more convenient to run it on port 80 instead so that you do not have to add on :8080 to your server name every time you type it (port 80 is the default HTTP port). Go to your Apache2 folder, and open the file httpd.conf in the conf folder. On around line 956, you will see
Listen 8080
change that to
Listen 80
Save the httpd.conf file, and restart Apache (in the Service Monitor, or manually quit and
start it again if you have not installed Apache as a service). We'll do more configuration of Apache later.
3. Download and Install PHP 5
The PHP documentation is very good,
I encourage you to read it over a bit before proceeding, or if you get stuck/confused below.
Start by going to the PHP.net download page and getting the
PHP 5.x.x zip package under the "Windows Binaries" heading. It may seem easier to use the installer, but as you work with PHP, you will probably want to enable several extensions that are not enabled by default, and this is much simpler if you have installed PHP manually.
After the zip file downloads, place it in your WebServer\PHP directory, and unzip it there. When
it is done decompressing all the files, you can delete the zip file. Notice that there are a few executables:
php-cgi.exe: This is used when you run PHP through your webserver as a CGI executable.php-win.exe: Executes scripts without having to have an open command prompt. You can drag your php scripts onto this program to execute them. You'll use this for local command line (command line interface, or CLI) programs.php.exe: the CLI interface for command line scripting. You'll use this from the command prompt to execute PHP.
For PHP to work with Apache and to make the CLI available from any command prompt window, we need to add the PHP folder to the PATH environment variable. To do this,
right click on your "My Computer" icon (either on your desktop or the start menu) and select "Properties." In the window that pops up, select the advanced tab, and click on the "Environment Variables" button.
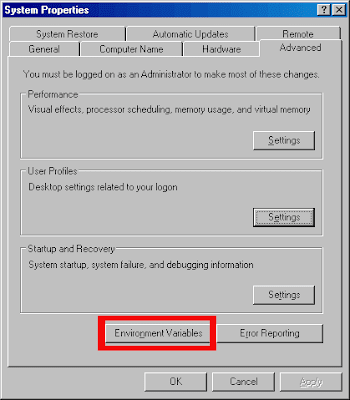
In the window that appears, select the "Path" variable line from the "System Variables" menu, and click edit:
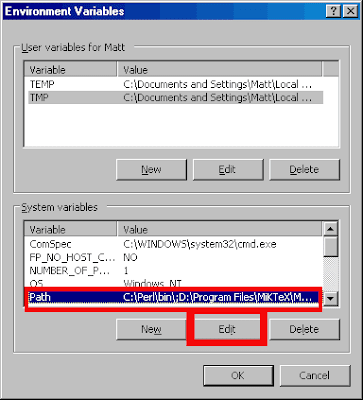
At the end of the "Variable Value" field, type a semicolon (;) and the type in the full path to your
PHP folder. For me, this means typing the following at the end of the "Variable Value" field:;D:\Web\WebServer\PHP.
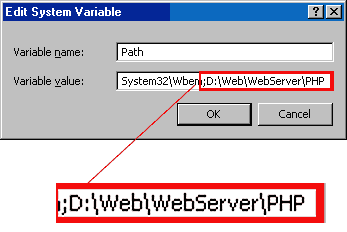
Hit OK in each window until they have all closed, and restart your computer.
Pick up back here when you've restarted.
OK, you restarted and you're back. Let's make sure PHP is working. Go to Start->Run and type cmd and press OK to bring up a command window. At the command prompt, type php -v and press Enter. If you updated the PATH varaible correctly, you should see something like:
If you get an error message like,
PHP 5.1.2 (cli) (built: Jan 11 2006 16:40:00)
Copyright (c) 1997-2006 The PHP Group
Zend Engine v2.1.0, Copyright (c) 1998-2006 Zend Technologies
"php is not recognized as an internal or external command," go back and check to make sure you completed all the steps
operable program or batch file
of adding your PHP folder to your PATH variable, and that you typed the file path correctly.
Now open you PHP folder, and change the name of the file php.ini-recommended
to php.ini. The settings in this file are all pretty much exactly as they should be.
If you are installing Apache and PHP on your own system for testing purposes, it is probably a good idea to open your php.ini file in a text editor, and change the setting on or about line
357 from display_errors = Off to display_errors = On so that you will see any errors generated by your scripts and will be able to easily debug them. If you are planning on making
your server public, it is best to leave this setting Off, because displaying errors can expose information about your file system, databases, and server configuration that should be kept private. Either way, the setting on line 367, log_errors = On will ensure that you will have a log of errors that you can review.
Line 512: doc_root = D:\Web\WebServer\Apache2\htdocs
Line 519: extension_dir = D:\Web\WebServer\PHP\ext
Save the php.ini file and close it. You can find more information about
configuring PHP in the Runtime Configuration section
of the PHP manual.
4. Configuring Apache
Now that we've got PHP and Apache working separately, we need to get get them to work together.
Go to your Apache2/conf folder, and open up the httpd.conf file in a text
editor. You can get Apache to run PHP as either a CGI binary, or an Apache Module. Generally speaking,
it is faster and more secure to do the latter, which you do by adding the following to yourhttpd.conf file:
At the top of the LoadModule section, starting around line 130, add the line
LoadModule php5_module "D:/Web/WebServer/PHP/php5apache2.dll"(note those are foward slashes, not backslashes, in the path) where you
replace"D:/Web/WebServer/PHP/php5apache2.dll"with the path tophp5apache2.dllon your computer (note: if you are installing Apache 2.2, you should use thephp5apache2_2.dllfile instead). You can actually add settings anywhere you would like, but putting the similar ones together helps keep things organized.In the AddType section around line 754, add the following line:
AddType application/x-httpd-php .phpYou can add other extensions besides
.phpif you want PHP to parse other file types as well. For example, if you want to be able to include PHP in.htmldocuments:AddType application/x-httpd-php .php .htmlFinally, add the following line, somewhere that seems sensible to you:
PHPIniDir "D:/Web/WebServer/PHP/"(again, replace the path I used with the one you chose on your computer).
Note: If Apache does not seem to recognize your PHPIniDir directive,
make sure you have the trailing slash (i.e. not PHPIniDir "D:/Web/WebServer/PHP"), as mentioned in the user comments in the PHP manual
Save the httpd.conf file, and start Apache as discussed above (or restart it if it is running).
If for some reason you need to run PHP as a CGI binary, add these lines to your httpd.conf file instead.
ScriptAlias /php/ "D:/Web/WebServer/PHP/"
AddType application/x-httpd-php .php
Action application/x-httpd-php "/PHP/php-cgi.exe"
#) or delete the existing configuration lines before adding the new ones. Each time you change the server configuration by editing httpd.conf, you'll need to restart Apache for the changes to take effect.Open your Apache2htdocs folder. This is the root folder for all of your web server documents that you will view in your web browser. Start by erasing all the default files currently in there. Next, make a file called phpinfo.php that contains the following:
<?php phpinfo(); ?>
and save it in your htdocs folder. Now open a web browser and go to
http://localhost/phpinfo.php. You should see a page that looks like

If not, make sure that all the lines that you added to your httpd.conf file are exactly as they appear above (including the trailing slashes where applicable), and that all paths are correct.
5. Some extra steps: Setting up a development environment and installing MySQL
In principle, we're done. You can now start writing your own PHP scripts in your htdocs folder
and viewing them in your web browser (when Apache is running, of course) at http://localhost or whatever URL where you have chosen to locate your webserver. There are a couple more things that are good to do in practice in order to set yourself up with a nice working environment.
-
Place some shortcuts on your desktop. Add one for your
htdocsfolder for easy access, and another to start Apache (if you're running Apache as a module, you can just as easily use the service monitor).Add a folder called
PHPCLIto yourWebServerdirectory, where you can will keep you command line PHP scripts. Place a shortcut to this on your desktop too, and make a file calledPHPFolder.baton your desktop that contains the following lines:D:
cmd /k cd D:\Web\WebServer\PHPCLIThis will open a command prompt in your
PHPCLIfolder so that you can easily test and run your CLI scripts. -
Enable some extensions. Open up your php.ini file again, and go to abou line 620. There are a whole bunch of lines that look like
;extension=php_mbstring.dll
;extension=php_bz2.dll
;extension=php_curl.dll
;extension=php_dba.dll
;extension=php_dbase.dll
;extension=php_exif.dll
;extension=php_fdf.dll
;extension=php_filepro.dll
;extension=php_gd2.dll
;extension=php_gettext.dll
;extension=php_ifx.dll
;extension=php_imap.dll
;extension=php_interbase.dll
;extension=php_ldap.dll
;extension=php_mcrypt.dll
;extension=php_mhash.dll
The semicolon (
;) is the comment symbol in thephp.ini(don't confuse it with the#
in thehttpd.conf), and thus these lines are commented-out, and the extensions are not running. To enable any extensions that you want, just remove the semicolon at the beginning of the line.
Some of the extensions, such as MySQL, require that you have other software installed. In fact, as an added bonus, here's how to install MySQL:
Installing MySQL Server
-
Go to the MySQL website and download the installer.
You want the Windows (x86) version (you'll have to scroll down a bit to see it -- don't confuse it with the Windows Essentials version). Note the MD5 checksum, which
we'll use in step 2. Choose a mirror that is a close to you a possible and download the zip file (or just click "Download" and one will be chosen for you). -
Check the MD5 checksum with the value they have next to the download link on the site.
You do this in the same way you did for Apache above, but this time using the name of the zip file, e.g.md5sums -p -n -b mysql-5.0.18-win32.zipIf it checks out, unzip the file (this will produce a file called
Setup.exe), and delete the zip file after it's done. If the checksum does not match, download again from another mirror. -
Make a
MySQLfolder in yourWebServerdirectory. RunSetup.exe.
Click "Next" at the first screen.
At the second screen, choose "Custom" for the installation type and click "Next". Click on the "Change" button in the lower left to change the installation directory, and point it to theMySQLfolder youjust created:
Then click "Install" and let it do its thing. When it's done, you can sign up for a MySQL.com account if you want to. Otherwise, choose "Skip Sign-Up" in the bottom left and press Next, and then press Finish on the next screen.
-
The MySQL Server Instance Configuration Wizard will pop up. Click "Next". Choose "Detailed Configuration"
and click "Next". Answer the questions according to what kind of machine your computer is. The instructions are fairly straight forward. On the Windows Options Page, you may want to un-check the "Launch MySQLServer automatically" option, and check the Include Bin Directory in WindowsPATHso that you can use the MySQL server from the windows command line. It is easiest to Run MySQL as a Windows service.
Note that you can use the Apache Service monitor to start and stop MySQL (and other services).
On the next screen, pick a root password. This is the main "superuser" password for your server:

Finally, click the "Execute" button to configure your MySQL server:

Its not a big deal if you do not configure your server right at first, you can always run the config wizard again later. It is in your
MySQLbinfolder,MySQLInstanceConfig.exe. - Restart (this is so your
PATHvariable gets updated). -
Uncomment the line
extension=php_mysql.dll(around line 650) in yourphp.ini
and (re)start Apache. -
Have a look at your
phpinfo.phpfile. If you sucessfully set up MySQL, it should have a section that looks like this:
mysql -u root -p and entering your root password (which you set during the MySQL installation) when prompted. You can also access the mysqladmin command this way to add other users to your databases (there is also a command line connection option in the MySQL section of your program list in the Start menu).MySQL Administrator: A Graphical Interface
If you're not comfortable with using MySQL from the command line (or even if you are), you might want to get yourself a graphical administration tool. Several GUIs are available; I use the one made by MySQL, called the MySQL Administrator. Just download it
(be sure to check the MD5 checksum), and run the installer choosing the "Complete" installation type. You can install it anywhere you'd like (I put mine in my Program Files folder). Have a look at the documentation for more information about using MySQL Administrator.
Note: A couple times when I've installed MySQL Server and Administrator, I had trouble connecting to MySQL using the Administrator, even though it worked fine from the command line. I spent a very long time trying to figure out why this happened, and was never able to figure it out for sure. If this happens to you, try reconfiguring MySQL as described above (maybe you made a mistake the first time). If that doesn't work, the problem has always been solved for me by simply uninstalling both the Server and the Administrator (use the Add and Remove Programs option in your Windows XP Control Panel) and reinstalling.
6. Conclusion
Congratulations! You've got a great environment set up for building an testing websites and web applications. Hopefully you didn't find the process too painful. Have fun with it!
10 comments:
Great article!
Small remarks:
1)
Only PHP5.3 "VC9 x86 Thread Safe mode" zip file includes "php5apache2_2.dll".
2)There is no php.ini-recommended but php.ini-production and php.ini-development.
I used php.ini.production and did some minor modifications on it.
3)DirectoryIndex index.html
should be changed to
DirectoryIndex index.php index.html for php home page to load.
Great Article..
PHP Training in Chennai
Online PHP Training
Online PHP Training India
PHP Training Chennai
PHP Training institute in Chennai
Great post, keep updating more..
Best iOS Training in Chennai
CIIT Noida provides Best MCA Courses in Noida based on the current IT industry standards that help students to get high paying jobs in Top MNCs. CIIT provides Best MCA Training in Noida, Greater Noida, and Ghaziabad. CIIT is one of the trusted MCA training institutes in Noida providing practical knowledge and 100% job assistance with basic as well as advanced level MCA subjects. CIITN is the best MCA college in Noida, greater noida, ghaziabad, delhi, gurgaon regoin.
At CIIT MCA classes in Noida is conducted by subject experts corporate professionals with 9+ years of experience in managing real-time and live projects. Sofracle Nano Specialized MCA classes Noida is the perfect blend of academic learning and practical sessions to provide maximum exposure to students that transform an average student into a corporate professional whom companies prefer to hire.
Best MCA College in Noida
Best Website Design company - PHP,JAVA,ANDROID App Developement Company
Chase4Net is a Software Company and having office at Chennai & bangalore . Our main focus areas are Web Development and Software Development.
Chase4Net has been ranked as the No.1 for the web designing company in Chennai & Bangalore.
How to start the Online Bussiness ?
To start the Business in online is very simple and more profitable . Today starting the Website desining Company is one of the more profitable business with less invesment.
We are having the talented Team with 8 years Expereince in webdesign business , which will guide to start the software company quickly with lesss effort.
Now a days all the business are moving towards online . Too start the company we need correct Business Model and thats Chase4Net . We will help you to setup the Website design Company at less cost . The website desing compnay can offer the following Logo design,website design , webhosting , domain registartion ,android app development .
Even If you do not know how to develop wensite no woriess . Chase4Net will be there always with you , we can help you on the business by developing a websiite a behalf og you.
We also have team who deloped application such as Hotel booking website design |, bus tickect booking website desing | , shopping cart website desing | , hospital website desing |,
bill software desing |,job website design |,tickect booking website design | ,matrimonial website design |,RealEstate website design .
You just become a website design company reseller program , We will take you to the next level.
Enter into partnership with us so that we can help you to setup your business including website design for your company,Email-Id creation,Web Hosting membership,Domain Reseller membership,Payment Gateway Integration,SMS Integration.Chase4Net ensures
you to start the business from day one rather than making you run behind business plans.To be our franchise we charge as low as INR Rs 20000/- (or) $296To pay the franchise membership fee How to pay
How to start the software company ?
Best Website Design company - PHP,JAVA,ANDROID App Developement Company
Chase4Net is a Software Company and having office at Chennai & bangalore . Our main focus areas are Web Development and Software Development.
Chase4Net has been ranked as the No.1 for the web designing company in Chennai & Bangalore.
To start the in Software comany is very simple and more profitable . To start the business first you need a Team which supprt for your everything.
In todays software development is nothing but a web application . To develop a webapplication you need start the Website desining Company is one of the more profitable business with less invesment.
We are having the talented Team with 8 years Expereince in webdesign business , which will guide to start the software company quickly with lesss effort.
There are many business includes in website developmet - Logo design,website design , webhosting , domain registartion ,android app development .
Even If you do not how to develop wensite no woriess . Chase4Net will be there always with you , we can help you on the business by developing a websiite a behalf og you.
We also have team who deloped application such as Hotel booking website development |, bus tickect booking website development | , shopping website development | , hospital website development |,
bill software desing | ,job website development |, tickect booking website development | ,matrimonial website development |,RealEstate website development .
You just become a website design company by website desgin reseller program , We will take you to the next level.
Enter into partnership with us so that we can help you to setup your business including website design for your company,Email-Id creation,Web Hosting membership,Domain Reseller membership,Payment Gateway Integration,SMS Integration.Chase4Net ensures
you to start the business from day one rather than making you run behind business plans.To be our franchise we charge as low as INR Rs 20000/- (or) $296To pay the franchise membership fee.How to pay
Best software training institute in Chennai. Make your career development the best by learning software courses.
blue prism training institute in chennai
power bi training in chennai
rpa training in chennai
A Revolution in Business Marketing Businesses may send customized messages that stand out in the packed inbox using RAT SMS's WhatsApp Promotional Offers. Businesses may send their audience exclusive deals, flash sales, or seasonal promotions by using the WhatsApp Business API. Customers have a more interesting and customized experience as a result of this direct relationship.
Post a Comment